
µ£¼µ¢ćõĮ┐ńö©ńÜäĶÖܵŗ¤µ£║ĶĮ»õ╗ČõĖ║’╝Ü
VirtualBox-3.2.4-62467-Win.exe
õĖŗĶĮĮÕ£░ÕØĆ’╝Ü
http://dlc.sun.com.edgesuite.net/virtualbox/3.2.4/VirtualBox-3.2.4-62467-Win.exe
┬Ā
Õ«ēĶŻģńÜäLinuxńēłµ£¼õĖ║’╝Ü
ń║󵌌LinuxµĪīķØóńēł6.0ń│╗ń╗¤Õģēńøś.iso
õĖŗĶĮĮÕ£░ÕØĆ’╝Ü
http://www.xdowns.com/soft/softdown.asp?softid=38411
┬Ā
1.µ¤źń£ŗXPńÜäIPÕ£░ÕØĆ
Õ£©XPÕæĮõ╗żĶĪīń¬ŚÕÅŻõĖŁ’╝īĶŠōÕģźŌĆ£ipconfigŌĆØ’╝īń╗ōµ×£Õ”éõĖŗ’╝Ü
C:/Documents and Settings/Administrator>ipconfig
Ethernet adapter µŚĀń║┐ńĮæń╗£Ķ┐׵ğ:
Connection-specific DNS Suffix┬Ā . :
IP Address. . . . . . . . . . . . : 192.168.0.101
Subnet Mask . . . . . . . . . . . : 255.255.255.0
IP Address. . . . . . . . . . . . : fe80::21f:3cff:fee3:6390%9
Default Gateway . . . . . . . . . : 192.168.0.1
┬Ā
2.µ¤źń£ŗĶÖܵŗ¤µ£║LinuxńÜäIPÕ£░ÕØĆ
Õ£©LinuxÕæĮõ╗żĶĪīń¬ŚÕÅŻ’╝īĶŠōÕģźŌĆ£ifconfigŌĆØ’╝īń╗ōµ×£Õ”éõĖŗ’╝Ü
[root@localhost ~]# ifconfig
eth0┬Ā┬Ā┬Ā┬Ā┬Ā Link encap:Ethernet┬Ā HWaddr 08:00:27:48:30:9B
┬Ā┬Ā┬Ā┬Ā┬Ā┬Ā┬Ā┬Ā┬Ā inet addr:10.0.2.15┬Ā Bcast:10.0.2.255┬Ā Mask:255.255.255.0
┬Ā┬Ā┬Ā┬Ā┬Ā┬Ā┬Ā┬Ā┬Ā inet6 addr: fe80::a00:27ff:fe48:309b/64 Scope:Link
┬Ā┬Ā┬Ā┬Ā┬Ā┬Ā┬Ā┬Ā┬Ā UP BROADCAST RUNNING MULTICAST┬Ā MTU:1500┬Ā Metric:1
┬Ā┬Ā┬Ā┬Ā┬Ā┬Ā┬Ā┬Ā┬Ā RX packets:23 errors:0 dropped:0 overruns:0 frame:0
┬Ā┬Ā┬Ā┬Ā┬Ā┬Ā┬Ā┬Ā┬Ā TX packets:55 errors:0 dropped:0 overruns:0 carrier:0
┬Ā┬Ā┬Ā┬Ā┬Ā┬Ā┬Ā┬Ā┬Ā collisions:0 txqueuelen:1000
┬Ā┬Ā┬Ā┬Ā┬Ā┬Ā┬Ā┬Ā┬Ā RX bytes:5821 (5.6 KiB)┬Ā TX bytes:9823 (9.5 KiB)
┬Ā┬Ā┬Ā┬Ā┬Ā┬Ā┬Ā┬Ā┬Ā Base address:0xd010 Memory:f0000000-f0020000
lo┬Ā┬Ā┬Ā┬Ā┬Ā┬Ā┬Ā Link encap:Local Loopback
┬Ā┬Ā┬Ā┬Ā┬Ā┬Ā┬Ā┬Ā┬Ā inet addr:127.0.0.1┬Ā Mask:255.0.0.0
┬Ā┬Ā┬Ā┬Ā┬Ā┬Ā┬Ā┬Ā┬Ā inet6 addr: ::1/128 Scope:Host
┬Ā┬Ā┬Ā┬Ā┬Ā┬Ā┬Ā┬Ā┬Ā UP LOOPBACK RUNNING┬Ā MTU:16436┬Ā Metric:1
┬Ā┬Ā┬Ā┬Ā┬Ā┬Ā┬Ā┬Ā┬Ā RX packets:0 errors:0 dropped:0 overruns:0 frame:0
┬Ā┬Ā┬Ā┬Ā┬Ā┬Ā┬Ā┬Ā┬Ā TX packets:0 errors:0 dropped:0 overruns:0 carrier:0
┬Ā┬Ā┬Ā┬Ā┬Ā┬Ā┬Ā┬Ā┬Ā collisions:0 txqueuelen:0
┬Ā┬Ā┬Ā┬Ā┬Ā┬Ā┬Ā┬Ā┬Ā RX bytes:0 (0.0 b)┬Ā TX bytes:0 (0.0 b)
ńö▒µŁżÕÅ»Ķ¦üLinuxńÜäIPÕÆīXPńÜäIPõĖŹÕ£©õĖĆõĖ¬ńĮ浫Ą’╝ī
┬Ā
3.ĶÖܵŗ¤µ£║LinuxõĖŖpingõĖ╗µ£║XPńÜäIP
Õ£©LinuxÕæĮõ╗żĶĪīń¬ŚÕÅŻ’╝īĶŠōÕģźŌĆ£ping 192.168.0.101ŌĆØ’╝īń╗ōµ×£Õ”éõĖŗ’╝Ü
[root@localhost ~]# ping 192.168.0.101
PING 192.168.0.101 (192.168.0.101) 56(84) bytes of data.
64 bytes from 192.168.0.101: icmp_seq=1 ttl=64 time=0.343 ms
64 bytes from 192.168.0.101: icmp_seq=2 ttl=64 time=1.99 ms
64 bytes from 192.168.0.101: icmp_seq=3 ttl=64 time=4.95 ms
64 bytes from 192.168.0.101: icmp_seq=4 ttl=64 time=0.766 ms
64 bytes from 192.168.0.101: icmp_seq=5 ttl=64 time=0.709 ms
64 bytes from 192.168.0.101: icmp_seq=6 ttl=64 time=4.73 ms
µŁżµŚČLinuxµś»ĶāĮµŁŻÕĖĖõĖŖńĮæńÜä’╝īÕÅ»õ╗źõĮ┐ńö©µĄÅĶ¦łÕÖ©Ķ«┐ķŚ«ńĮæķĪĄ
┬Ā
4.õĖ╗µ£║XPõĖŖpingĶÖܵŗ¤µ£║LinuxńÜäIP
Õ£©XPÕæĮõ╗żĶĪīń¬ŚÕÅŻõĖŁ’╝īĶŠōÕģźŌĆ£ping 10.0.2.15ŌĆØ’╝īń╗ōµ×£Õ”éõĖŗ’╝Ü
C:/Documents and Settings/Administrator>ping 10.0.2.15
Pinging 10.0.2.15 with 32 bytes of data:
Request timed out.
Ķ»┤µśÄµŁżµŚČ2õĖ¬ń│╗ń╗¤µś»õĖŹĶāĮõ║ÆpingµłÉÕŖ¤ńÜä
┬Ā
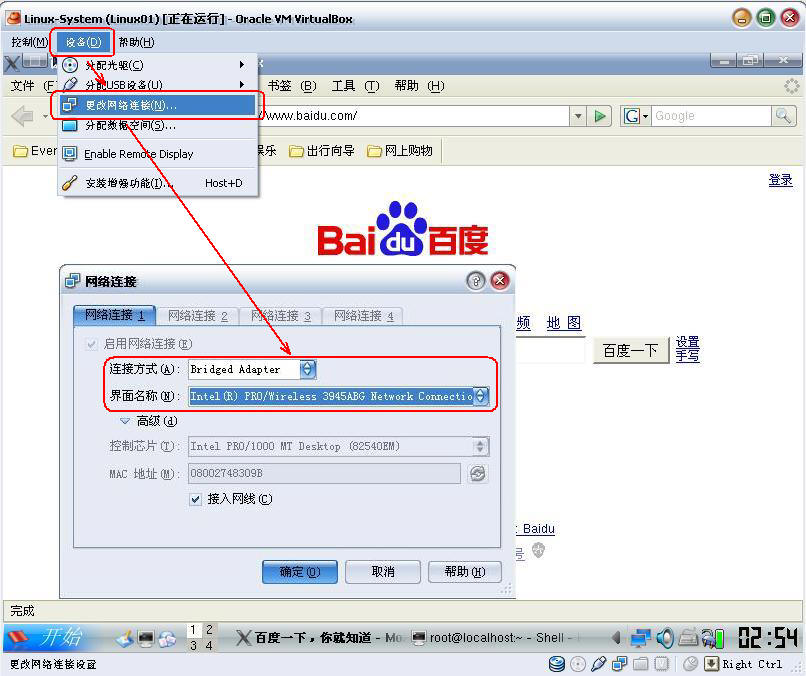
5.µø┤µö╣ĶÖܵŗ¤µ£║LinuxńĮæń╗£Ķ┐׵ğµ¢╣Õ╝Å
ĶÖܵŗ¤µ£║ń¬ŚÕÅŻ-->Ķ«ŠÕżć(D)-->µø┤µö╣ńĮæń╗£Ķ┐׵ğ(N)
Õ£©Õ╝╣Õć║ńÜäŌĆ£ńĮæń╗£Ķ┐׵ğŌĆØń¬ŚÕÅŻõĖŁ’╝īÕ░å
Ķ┐׵ğµ¢╣Õ╝Å(A)µö╣õĖ║’╝ÜBridged Adapter
ńĢīķØóÕÉŹń¦░õĖŁķĆēµŗ®õĮĀõĖ╗µ£║XPõĮ┐ńö©ńÜäńĮæÕŹĪ’╝īÕ”éõĖŗÕøŠ’╝Ü
┬Ā
┬Ā
õ┐«µö╣ÕÉÄ’╝īõĮĀõ╝ÜÕÅæńÄ░µŁżµŚČLinuxµŚĀµ│ĢĶ«┐ķŚ«ńĮæķĪĄ
┬Ā
6.Ķ«ŠńĮ«õĖŗĶÖܵŗ¤µ£║LinuxńÜäIPÕ£░ÕØĆ
ĶÖܵŗ¤µ£║Linuxń│╗ń╗¤õĖŁ’╝īÕÅ│õĖŗĶ¦Æµ£ēńĮæń╗£Ķ┐׵ğÕøŠµĀć’╝īÕÅ│ķö«ńé╣Õć╗’╝īÕ£©Õ╝╣Õć║ÕÅ│ķö«ĶÅ£ÕŹĢõĖŁķĆēµŗ®ŌĆ£Õ▒׵ƦŌĆØ
Ķ«ŠńĮ«IPÕ£░ÕØĆÕ”éõĖŗ’╝Ü
┬Ā
┬Ā
õ┐«µö╣Õ«īÕÉÄ’╝īńäČÕÉÄķćŹÕżŹ3-4µŁź’╝īµŻĆµ¤ź2õĖ¬ń│╗ń╗¤µś»ÕÉ”ĶāĮõ║ÆpingµłÉÕŖ¤
┬Ā
7.ĶÖܵŗ¤µ£║LinuxÕÉ»ÕŖ©SSHµ£ŹÕŖĪ
ķ╗śĶ«żµāģÕåĄõĖŗ’╝īLinuxÕ╝Ƶ£║µś»õĖŹÕÉ»ÕŖ©SSHµ£ŹÕŖĪńÜä’╝īĶ”üµā│XPń│╗ń╗¤ķĆÜĶ┐ćSSHµØźÕÆīLinuxõ║żõ║ÆÕ┐ģķĪ╗Õ░åÕ«āÕ╝ĆÕÉ»
Õ£©LinuxÕæĮõ╗żĶĪīń¬ŚÕÅŻ’╝īĶŠōÕģźŌĆ£service sshd statusŌĆØ’╝īń╗ōµ×£Õ”éõĖŗ’╝Ü
[root@localhost ~]# service sshd status
sshd ÕĘ▓Õü£
ĶĪ©µśÄSSHµ£ŹÕŖĪµ£¬Õ╝ĆÕÉ»
Õ£©LinuxÕæĮõ╗żĶĪīń¬ŚÕÅŻ’╝īĶŠōÕģźŌĆ£service sshd statusŌĆØ’╝īń╗ōµ×£Õ”éõĖŗ’╝Ü
[root@localhost ~]# service sshd start
ńö¤µłÉ SSH1 RSA õĖ╗µ£║ķö«’╝Ü┬Ā┬Ā┬Ā┬Ā┬Ā┬Ā┬Ā┬Ā┬Ā┬Ā┬Ā┬Ā┬Ā┬Ā┬Ā┬Ā┬Ā┬Ā┬Ā┬Ā┬Ā┬Ā┬Ā┬Ā┬Ā┬Ā┬Ā┬Ā┬Ā┬Ā┬Ā┬Ā┬Ā┬Ā┬Ā┬Ā [ńĪ«Õ«Ü]
ńö¤µłÉ SSH2 RSA õĖ╗µ£║ķö«’╝Ü┬Ā┬Ā┬Ā┬Ā┬Ā┬Ā┬Ā┬Ā┬Ā┬Ā┬Ā┬Ā┬Ā┬Ā┬Ā┬Ā┬Ā┬Ā┬Ā┬Ā┬Ā┬Ā┬Ā┬Ā┬Ā┬Ā┬Ā┬Ā┬Ā┬Ā┬Ā┬Ā┬Ā┬Ā┬Ā┬Ā [ńĪ«Õ«Ü]
µŁŻÕ£©ńö¤µłÉ SSH2 DSA õĖ╗µ£║ķö«’╝Ü┬Ā┬Ā┬Ā┬Ā┬Ā┬Ā┬Ā┬Ā┬Ā┬Ā┬Ā┬Ā┬Ā┬Ā┬Ā┬Ā┬Ā┬Ā┬Ā┬Ā┬Ā┬Ā┬Ā┬Ā┬Ā┬Ā┬Ā┬Ā┬Ā ┬Ā[ńĪ«Õ«Ü]
ÕÉ»ÕŖ© sshd’╝Ü┬Ā┬Ā┬Ā┬Ā┬Ā┬Ā┬Ā┬Ā┬Ā┬Ā┬Ā┬Ā┬Ā┬Ā┬Ā┬Ā┬Ā┬Ā┬Ā┬Ā┬Ā┬Ā┬Ā┬Ā┬Ā┬Ā┬Ā┬Ā┬Ā┬Ā┬Ā┬Ā┬Ā┬Ā┬Ā┬Ā┬Ā┬Ā┬Ā┬Ā┬Ā┬Ā┬Ā┬Ā┬Ā┬Ā┬Ā┬Ā┬Ā┬Ā┬Ā┬Ā┬Ā┬Ā┬Ā┬Ā┬Ā [ńĪ«Õ«Ü]
ĶĪ©µśÄSSHµ£ŹÕŖĪÕĘ▓ÕÉ»ÕŖ©
┬Ā
8.Õ£©XPõĖŁķĆÜĶ┐ćŌĆ£SecureCRTŌĆصł¢ĶĆģń▒╗õ╝╝ĶĮ»õ╗Č’╝īõĮ┐ńö©SSHÕŹÅĶ««ńÖ╗ķÖåÕł░ĶÖܵŗ¤µ£║LinuxõĖŁ
Last login: Mon Jun 14 03:09:40 2010 from 192.168.0.101
[root@localhost ~]#┬Ā
[root@localhost ~]#┬Ā
[root@localhost ~]# ll
µĆ╗Ķ«Ī 45
-rwx------ 1 root root┬Ā┬Ā 771 06-12 10:15 anaconda-ks.cfg
drwx------ 3 root root┬Ā 1024 06-14 02:46 Desktop
-rwx------ 1 root root 38147 06-12 10:15 install.log
-rwx------ 1 root root┬Ā 3732 06-12 10:15 install.log.syslog
[root@localhost ~]#
┬Ā
ĶĪ©µśÄńÖ╗ķÖåµłÉÕŖ¤
┬Ā
Ķć│µŁż’╝īĶÖܵŗ¤µ£║LinuxńÜäńĮæń╗£ÕĘ▓ń╗ÅķģŹńĮ«Õ«īµ»Ģ


ńøĖÕģ│µÄ©ĶŹÉ
õĮĀĶ┐śÕ£©õĖ║µ¢░Õ«ēĶŻģńÜäĶÖܵŗ¤µ£║õĖŹĶāĮõĖŖńĮæÕÅæµäüÕÉŚ’╝¤Õģ│õ║ÄlinuxõĖŖńĮæķģŹńĮ«õĮĀĶ┐śµ▓Īµ£ēÕ«īÕģ©µÄīµÅĪÕÉŚ’╝¤ķ鯵¼óĶ┐ÄõĖŗĶĮĮĶ┐Öń»ćµ¢ćµĪŻÕŁ”õ╣ĀõĖĆõĖŗÕɦ’╝ü
javaĶÖܵŗ¤µ£║Ķ»╗õ╣”ń¼öĶ«░’╝īõĖ╗Ķ”üµÅÅĶ┐░ķśģĶ»╗JavaĶÖܵŗ¤µ£║µĀĖÕ┐āµŖƵ£»ńÜäµÅÅĶ┐░ŃĆé
ĶÖܵŗ¤µ£║Õ«ēĶŻģoracleń¼öĶ«░’╝īÕīģµŗ¼Ķ»”ń╗åńÜäÕ«ēĶŻģµŁźķ¬żõ╗źÕÅŖķģŹńĮ«ńŁēŃĆé
õĮ┐ńö©ĶÖܵŗ¤µ£║Õ£©LinuxńÄ»ÕóāõĖŗķØóÕ«ēĶŻģoracle10gµ¢ćµĪŻ µ£¼õ║║ĶŖ▒õ║å3Õż®µŚČķŚ┤’╝īń«ĆÕŹĢµĆ╗ń╗ōõ║åõĖĆõĖŗÕēŹõ║║ńÜäń╗Åķ¬ī’╝īńäČÕÉĵĢ┤ńÉåõ║åõĖĆõĖ¬ń«ĆÕŹĢńÜäÕ«ēĶŻģµ¢ćµĪŻŃĆéõ╗ÄĶÖܵŗ¤µ£║-->linux-->oracleŃĆéŃĆéŃĆéÕćĀõ╣ĵ»ÅõĖƵŁźķāĮÕüÜÕł░õ║åµł¬ÕøŠ’╝īõ╣¤ÕŖĀÕģźõ║åõĖĆõ║øõĖ¬õ║║ńÜäĶ¦üĶ¦ŻŃĆéÕģČõĖŁ...
µĘ▒ÕģźjavaĶÖܵŗ¤µ£║ń¼öĶ«░http://blog.csdn.net/yangzl2008/article/details/8074667
Ķ┐ÖõĖ¬µ¢ćµĪŻõĖ╗Ķ”üĶ«░ÕĮĢĶć¬ÕĘ▒ķģŹńĮ«ARMÕ╝ĆÕÅæµØ┐ńÜäjavaĶ┐ÉĶĪīńÄ»ÕóāńÜäĶ┐ćń©ŗ’╝īķģŹńĮ«µłÉÕŖ¤ÕÉÄÕÅ»õ╗źµē¦ĶĪījavaµĄŗĶ»Ģõ╗ŻńĀü
javaÕŁ”õ╣Āń¼öĶ«░3’╝łjavaĶÖܵŗ¤µ£║’╝ējavaÕŁ”õ╣Āń¼öĶ«░3’╝łjavaĶÖܵŗ¤µ£║’╝ē
ńē®ĶüöńĮæÕ░▒µś»ARMµł¢ĶĆģRISC-VĶŖ»ńēć+linuxµōŹõĮ£ń│╗ń╗¤+QTńĢīķØóµ©ĪÕ╝Å’╝īÕ╝ĆÕÅæµŚČķ£ĆĶ”ülinuxń│╗ń╗¤Õ╝ĆÕÅæńÄ»ÕóāŃĆéÕŠłÕżÜÕģ¼ÕÅĖńö©ńÜ䵜»ubuntu’╝īububtuĶ┐×ÕŠ«õ┐ĪŃĆüQQŃĆüµ£ēķüōõ║æń¼öĶ«░ŃĆüÕ¢£ķ®¼µŗēķøģķāĮµ▓Īµ£ē’╝īÕō¬ķćīµ£ēUOSÕźĮńö©ŃĆéõ║żõ║Æõ╣¤õĖŹÕÅŗÕźĮŃĆéUOSµōŹõĮ£ĶĄĘµØźÕÆīwindows...
linuxõĖŗntpdÕ«ēĶŻģķģŹńĮ«ń¼öĶ«░linuxõĖŗntpdÕ«ēĶŻģķģŹńĮ«ń¼öĶ«░
µĘ▒ÕģźńÉåĶ¦ŻJavaĶÖܵŗ¤µ£║ÕŁ”õ╣Āń¼öĶ«░ÕƤķē┤.pdf
ń╗ŵĄÄÕŹ▒µ£║ńłåÕÅæÕż¦Õ«ČĶ┤Łõ╣░ń¼öĶ«░µ£¼ńÜäķóäń«ŚÕż¦Õ╣ģń╝®µ░┤’╝īõĮåµś»ÕĖéÕ£║õĖŖÕż¦ķćÅńÜäõĮÄõ╗Ęń¼öĶ«░µ£¼ńöĄĶäæõĮ┐ńö©ńÜ䵜»Linuxń│╗ń╗¤’╝īÕ£©Ķ┤Łõ╣░ń¼öĶ«░µ£¼µŚČµŚĀµ│ĢÕ£©ń¼¼õĖƵŚČķŚ┤Õ»╣ń¼öĶ«░µ£¼ńÜ䵜Šńż║ń│╗ń╗¤Ķ┐øĶĪīµĄŗĶ»ĢŃĆé µ£¼õ║║ńö©JavaÕ╝ĆÕÅæõ║åõĖĆõĖ¬ń«ĆÕŹĢńÜäÕ░ÅĶĮ»õ╗Č’╝īµÅÉõŠøń╗ÖÕ╣┐Õż¦ńĮæÕÅŗõĮ┐ńö©...
STM32Õ╝ĆÕÅæń¼öĶ«░’╝łķøČ’╝ēLinuxõĖŗķā©ńĮ▓Õ╝ĆÕÅæńÄ»Õóāõ┐«µö╣µŚČķŚ┤’╝Ü2021.06016 22:27õĮ┐ńö©ńÄ»Õóā’╝ÜUbuntu 20.04 CLionÕ«ēĶŻģõŠØĶĄ¢ńÄ»ÕóāÕ£©GNU T
ĶÖܵŗ¤µ£║õĖŗlinuxń│╗ń╗¤ÕÅŖNS2.33Õ«ēĶŻģń¼öĶ«░.pdf
µĘ▒ÕģźńÉåĶ¦ŻJavaĶÖܵŗ¤µ£║ń¼öĶ«░(ÕĖ”ńø«ÕĮĢ).docx
Ķ┐Öµś»Õ«ēĶŻģlinuxńÜäń¼öĶ«░’╝īĶ»”ń╗åõ╗ŗń╗Źõ║åÕ£©ĶÖܵŗ¤µ£║õĖŖÕ«ēĶŻģlinuxńÜäĶ┐ćń©ŗ’╝īµ¢ćõĖŁÕ»╣µ»ÅõĖ¬µŁźķ¬żĶ┐øĶĪīõ║åµł¬ÕøŠŃĆéÕ»╣õ║ÄlinuxÕłØÕŁ”ĶĆģµ£ēÕŠłÕźĮńÜäµīćÕ»╝õĮ£ńö©ŃĆé
ElasticsearchķøåńŠżķā©ńĮ▓ÕÅŖkibanaÕ«ēĶŻģń¼öĶ«░ElasticsearchķøåńŠżķā©ńĮ▓ķā©ńĮ▓µŁźķ¬ż1. õĮ┐ńö©rootĶ┤”µłĘÕłøÕ╗║ńö©µłĘ2. õĖŖµ¼ĪńøĖÕģ│Õ«ēĶŻģÕīģ3. Õ«ēĶŻģjava’╝łÕ”éÕĘ▓ń╗ÅÕ«ēĶŻģ’╝īÕÅ»õĖŹķ£ĆĶ”üķćŹÕżŹ’╝ē4. Õ«ēĶŻģES5. JVM ķģŹńĮ«6. õ┐«µö╣ń│╗ń╗¤ķģŹńĮ«7. ÕÉ»ÕŖ©elasticsearch...
ÕŁ”õ╣ĀlinuxńÜäń¼öĶ«░’╝īÕÅæÕł░ÕŹÜµ¢ćõ║å’╝īķē┤õ║ĵ¢ćµĪŻµ¢╣õŠ┐õ┐ØÕŁśÕÆīµ¤źķśģ’╝īÕÅæÕć║µØź’╝īÕģŹĶ┤╣ńÜäÕōł ÕŹÜµ¢ćµØźĶć¬http://blog.csdn.net/wklken’╝īÕģ▒12ń»ć’╝īń▒╗õ╝╝µēŗÕåī’╝īÕÅ»Õ┐½ķƤń╗āõ╣ĀÕÆīµ¤źķśģ’╝īÕ«╣µśōõĖŖµēŗ µ¢ćµĪŻÕłŚĶĪ©: Linuxń¼öĶ«░ŌĆöŌĆövimÕĖĖńö©µōŹõĮ£ÕÅŖµē®Õ▒ĢĶĪźÕģģ...
µ»öĶŠāÕģ©ķØóÕŁ”õ╣Āń¼öĶ«░µ¢ćµĪŻ’╝īÕłØÕŁ”JavaĶÖܵŗ¤µ£║Õ╗║Ķ««õĖŗµØźń£ŗń£ŗ
ÕēŹµ¼ĪõĖŖõ╝ĀńÜäKALI LINUX ĶÖܵŗ¤µ£║Õ«ēĶŻģń¼öĶ«░µ£ēõ║øń«ĆÕŹĢ’╝īµĀ╣µŹ«Õż¦Õ«ČĶ”üµ▒é’╝īÕó×ÕŖĀõ║åõ║øµł¬ÕøŠŃĆéńö▒õ║ĵ»öĶŠāÕ┐Ö’╝īµēĆõ╗źµ£ēõ║øÕ«ēĶŻģńö©µ¢ćÕŁŚĶ┐øĶĪīõ║åµÅÅĶ┐░’╝īµīēńØƵōŹõĮ£Õ░▒ÕÅ»õ╗źõ║åŃĆé
ÕģäÕ╝¤Ķ┐×Linuxµ¢░ńēłĶ¦åķóæµĢÖń©ŗ LAMP+LNMPńÄ»ÕóāµÉŁÕ╗║ÕÅŖķģŹńĮ«µĢÖń©ŗń¼öĶ«░